The pad editor screen allows the editing of various audio settings.
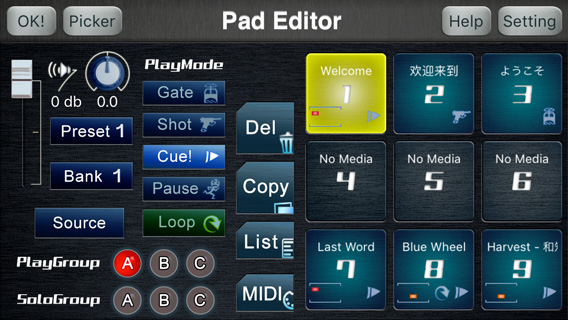
The sample pad allows users to control various settings of the assigned audio.
The user can press, release or long press the sample pad and control the selected audio.
※Pad color
Dark green: Audio can be changed.
Yellow: Audio is in edit mode.
(If the audio is currently playing, it will simultaneously flash in green)
Blue: Selectable pad number(s).
Yellow: Selected pad number(s).
※Title area

Title of the assigned audio.
※Status area

Selected settings (play mode/loop mode/play group/solo group) of the assigned audio.
※Restriction mark

Depending on the license, the restriction mark will light up to indicate that the audio cannot be played.

The pan-pot will pan (adjust the sound image) the selected audio.
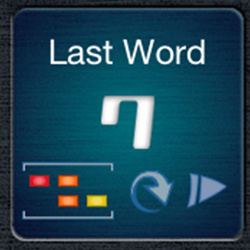
The Source button will assign specific audio to the designated sample pad.
Select the pad number(s) while pressing the Source button, and when the Source button is released, the Music picker (screen to select audio) will launch.
Select one or multiple audio samples from your music library, and press the "Done" button.
After returning to the Pad editor, push the "OK!" button and return to the Play view. The selected audio will load and will be ready to be played.
To delete an audio from the Sample pad, long press the pad you want to delete the audio from. A window will pop up. Press the "Reset" button.
The play mode adjusts the various play and stop settings of each audio.
Gate

Press the pad to play. When released, the audio will stop.
Shot

Press the pad to play. When the pad is pressed again while playing, the audio will replay from the beginning.
When long pressed during play, the audio will stop.
Cue!

Press pad to play. The audio will stop when pressed again. (Default)
Cue standby

By long pressing the Cue! button, the button will light in red, and the play mode will be set to the Cue standby.
This mode is same as the Cue! mode basically, but the play action or the stop action will launch when the finger is leaved from the sample pad.
Pause

Press pad to play. When pressed again the audio will pause. When pressed again the audio will restart from where it ended. Long press and the audio will stop.

By setting the loop mode, the audio will be played in a loop.

Audio selected in the same Play group will play simultaneously when one is played.

Select more than one audio in the same Solo group. When one audio is selected to play, and then a different audio from the same Solo group is played, the other audio will stop playing.

By using the Trash box button, the user can remove multiple audio samples.
While pressing the Trash box button, select the pad number(s) that you want to remove. When the button is released, selected sample(s) will be removed from the current page.

By using the Pasteboard button, the user can copy or paste multiple audio samples.
When the button displays "Copy", the audio samples are ready to be copied. Select pad number(s) that you want to copy while pressing the Pasteboard button. When the button is released, selected samples will be copied into the pasteboard.
When the button displays a number of sample clips, the audio samples are ready to be pasted into the selected pads in respective order. If there is a sample saved in the pad selected, a message will appear confirming the overwriting of the pad.
To remove audio samples from the pasteboard, please tap this button.

To edit the custom page list, launch the Page list editor by tapping this button.

The MIDI editor will launch by tapping this button.

The Music Picker screen will launch by tapping the Picker button. Various services will be operable on this screen without selecting audio.
To switch the type of the music picker between CueZy original and iPod normal for selecting audio, press button until the picker launches.
The music picker screen is able to collect various audio files in various ways, and can assign these audios to any pads. To collect any audio files, you can access to the following services:
* iPod library
* Open-in function on other apps
* iTunes File sharing
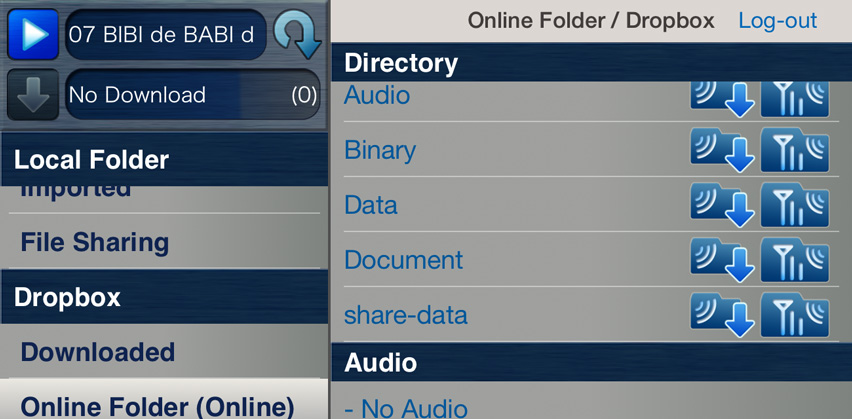
* Dropbox service
* Google Drive service
The available services and its categories are displayed at the Service menu on the left side of the Music picker screen. By selecting any category, the user can access to the various audio files and setting files. The available files that correspond to each services and categories are able to find from follows.
|
|
|
|
| iPod library |
Music library on the device which is currently using. |
|
| Local folder |
|
|
*Imported |
|
Available files that was opened from the Open-in function. |
| *File sharing |
|
Available files that was imported from the iTunes file sharing. |
| *Backup |
|
Setting files which were created for backup by CueZy. |
| *Package |
|
|
 |_Packed |_Packed |
|
Compressed files which is including a setting file and the audio files. |
| |_Unpacked |
|
Decompressed package data. |
|
| Dropbox |
|
|
*Downloaded |
|
Available files that was downloaded from the Dropbox service. |
| *Online folder |
|
Downloadable files on the Dropbox server. |
|
| Google Drive |
|
|
*Downloaded |
|
Available files that was downloaded from the Google Drive service. |
| *Online folder |
|
Downloadable files on the Google Drive server. |
The available items that is corresponding to the selected category are displayed at the Item list on the right side of the Music picker screen. The user can select or preview or download any items from here.

The item count indicates the number of the selected items and the number of the pads that is being selected. By tapping this area, the item that was selected at last will be canceled.

When there are an item for audio preview, can be played its audio file to tap this button, and the previewing file name will be indicated in the right side of the button. When the audio is being previewed, by tapping this button, current preview will stop.

When downloading some items, the download button will blink in blue, and the downloading file name and the status of the download including progress rate and item count will be indicated in the right side of the button.
In addition, by tapping this button, current item download will be stopped, and by keep pressing this button, all download schedule will be canceled immediately.


By tapping the Preview button on the item list, the preview item can be set, and then, audio preview will start.

To pick up the assignable audio item, tap the Add audio button from the item list.

To replace the current setting by any other setting files, tap the Apply setting button.

To decompress a package file that was compressed including a setting file and the audio files, tap the Unpack package button. These decompressed files can be refer from below. [ Local folder -> Package -> Unpacked ]


To export any files to the other apps, tap the Export button.

By opening the backup menu from [ Local folder -> Backup ], can be created the backup file, and new package that is including a setting file and the audio files, from the current settings.

To make a backup file from the current pad settings, tap the Make backup button.

To make a new package from the current pad settings and the referred audio files, tap the Make package button. However it is not able to include audio files in the iPod library.
To remove downloaded/Imported items on the local storage, move to edit mode to tap "Edit" label.

To close the Music Picker screen, or to cancel the selecting items, tap the Close button.
By using the Page list editor, the user can customize the page order.
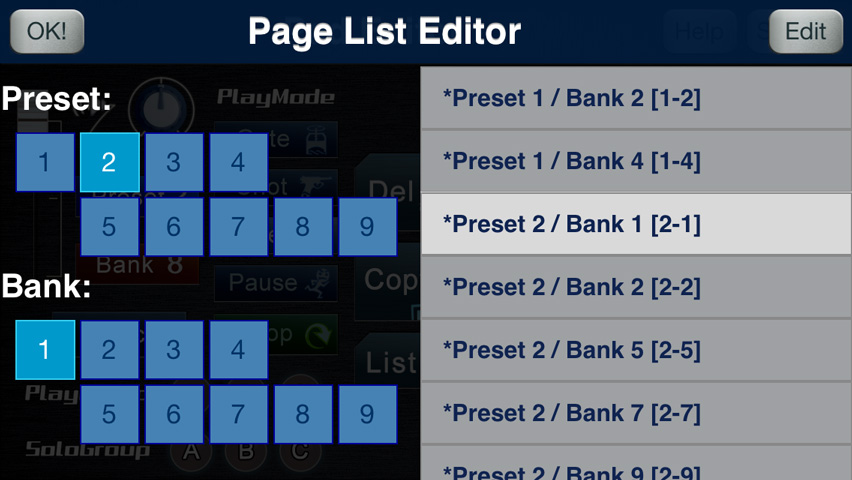
Select any row from the page list on right side, and select any preset number or bank number on left side.
To add, remove or replace rows on the page list, press the Edit button.
To finish editing the list, press the Done button.
By using the MIDI editor, the user can customize various MIDI settings and mappings for controlling app via the external MIDI devices.
Basic settings for MIDI function.
| Use MIDI : |
|
ON or OFF of the MIDI function. |
|
| Receive MIDI : |
|
Whether to receive MIDI data. |
|
| Send MIDI : |
|
Whether to send MIDI data. |
|
| Use in Background : |
|
Whether to use the MIDI function in the background. |
|
| Use Velocity : |
|
Whether to use a received velocity. |
|
| Receive LSB : |
|
Whether to receive LSB data of the Control Change for minutely control. |
|
| Send Echo back : |
|
When turn this mode on, the received MIDI parameter will be sent to the other MIDI ports. |
|
| Send Pad status : |
|
When turn this mode on, the sample pad status will be sent to the echo back ports.
Under this mode, the corresponding hardware button will light when the sample is loaded, and it will blink when start playing.
|
|
| Inputs : |
|
Can be selected input devices for receiving MIDI data. |
|
| Outputs : |
|
Can be selected output devices for sending MIDI data. |
|
| Echo back to : |
|
MIDI Output ports used for sending the echo back parameters. |
|
| Echo back value : |
|
A parameter value used when sending the echo back (Original value or 0 - 127). |
|
| All Controls Off : |
|
All MIDI control items to turn off. |
|
| Reset MIDI Mapping : |
|
Reset all redefined MIDI mappings. |
|

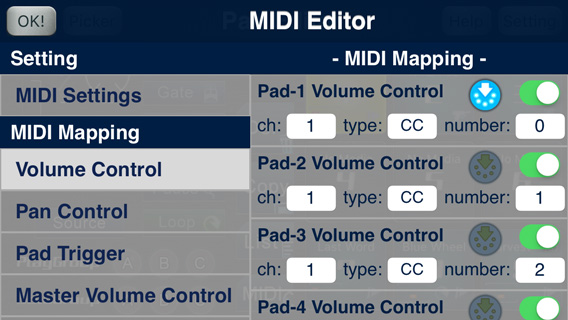
When in waiting state by tapping this button, received MIDI data can be used as MIDI parameter for controlling app.

ON or OFF of MIDI control for this item.

A MIDI channel for controlling app.

A MIDI message type for controlling app. (MIDI note / MIDI control change)

A MIDI number for controlling app.
| Volume Control : |
|
Control of the Channel faders on the Fader view. |
|
| Pan Control : |
|
Control of the Channel pan-pots on the Fader view. |
|
| Pad Trigger : |
|
Control of the Sample pads on the Play view as tap action.
(Any value is used as a velocity) |
|
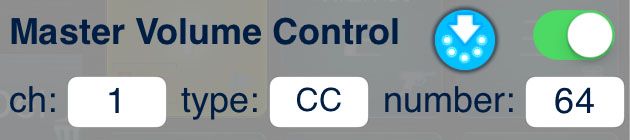
| Master Volume Control : |
|
Control of the Master fader on the Play view. |
|
| Switch Fader View : |
|
Control open or close action for the Fader view.
(Valid value are 64 or higher.) |
|
| Load Next Page : |
|
Loading of the next page.
(Valid value are 64 or higher.) |
|
| Load Prev Page : |
|
Loading of the previous page.
(Valid value are 64 or higher.) |
|
| Change Preset : |
|
Changing of the preset number.
(Any value is used as a preset number.) |
|
| Change Bank : |
|
Changing of the bank number.
(Any value is used as a bank number.) |
|
| Continue : |
|
Control of the Continue button as tap action.
(Valid value (1 or higher) is used as a velocity.) |
|
These are an explain for basic usage of the MIDI function in CueZy.
It needs four steps to use the MIDI function.
* Connect external MIDI devices to the iOS device.
* Turn on the MIDI function.
* Mapping any controllable items.
* Checking of MIDI control.
- In the first, Connect MIDI devices to iPhone/iPad.
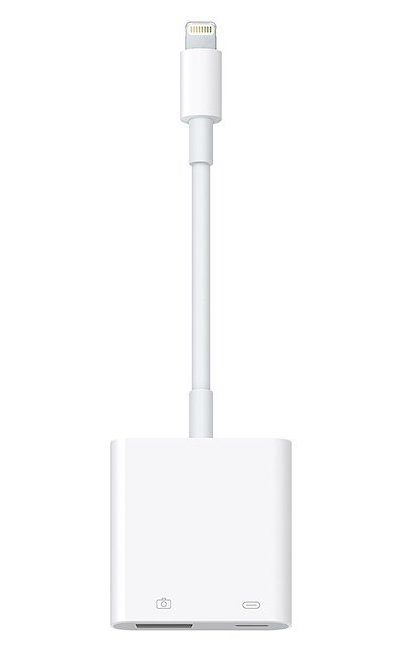
Please connect any MIDI devices that you want to control CueZy by using some adapters for instance Apple Lightning to USB Camera Adapter.
In case without using adapters, you also can connect MIDI devices to CueZy via Network MIDI on Mac.
- Second, turn on the MIDI function.

In the Play screen, keep pressing the MIDI switch. When the MIDI function becomes active, the MIDI switch will light, and the MIDI input lamp and the MIDI output lamp will blink in red twice.
When you launch the MIDI editor by tapping the MIDI button on the Pad editor, you also can turn on the MIDI function from the "Use MIDI" switch in the MIDI settings.
- Mapping of the controllable items.
To synchronize in between CueZy and the connected MIDI devices, please mapping about any controllable items.
To avoid confusion in between old mapping and new one, you also can use the "All Controls Off" command from the MIDI settings.
To apply any control mapping, you can choose a controllable item under the MIDI mapping section, and adjust parameters to the same value of the MIDI device's one.
Required parameters are as below.
- MIDI channel
- MIDI message type
- MIDI number
At this time, if ON/OFF switch is OFF, turn this on by tapping.
Moreover, by using the MIDI receive button, you can do this process very easily.
Tap and light the MIDI receive button that you want to change the parameter, and manipulate any button or slider on the external MIDI device, then the received MIDI parameter will be applied to the mapping.
- Checking of MIDI control.
Finally, please check out the action of MIDI control via external devices after back to the Play screen or the Fader screen.
|


 The volume fader controls the individual audio’s base volume. Please be aware that there is also the Master fader that will control all audio volumes.